As an Amazon Associate, I earn from qualifying purchases. There is no extra cost to you. Thank you if you use our links; we appreciate it! Learn More.
Golf gloves are an essential piece of equipment for any golfer, providing grip, comfort, and control during every swing. But after countless rounds, your gloves inevitably face wear and tear—dirt, sweat, and stains can accumulate, leaving them looking and feeling far from their best.
Learning how to clean golf gloves not only revitalizes their appearance but also extends their lifespan, ensuring they perform at their peak round after round. Whether your gloves are made of premium leather, durable synthetic material, or a hybrid of both, knowing the proper care techniques is key to keeping them in top-notch condition.
In this guide, we’ll walk you through everything you need to know about cleaning your golf gloves, from simple spot-cleaning tips to deep-cleaning techniques for stubborn grime. Along the way, you’ll discover smart maintenance practices and helpful tricks to make your gloves last longer and feel better with every game.
Let’s dive in and give your gloves the care they deserve!
Why Clean Golf Gloves Matter
Keeping them clean isn’t just about appearances; it’s about ensuring they deliver peak performance and longevity.
Impact on Performance
A well-maintained golf glove can make all the difference between a perfect swing and a mishit. Over time, sweat, dirt, and oils from your hands accumulate, creating a slippery surface that undermines grip. This loss of traction can lead to inconsistent shots and reduced confidence in your hold. Regular cleaning golf gloves restores their grip, ensuring that your connection with the club remains firm and reliable, no matter the conditions.
Dirty gloves can also harden or stiffen, compromising their flexibility. Flexibility is critical for seamless hand movement during swings. By adopting the best practices for golf glove cleaning, you maintain the glove’s suppleness, allowing it to conform comfortably to your hand.
Extending Glove Lifespan
Golf gloves are an investment, and like any investment, they deserve proper care. Neglecting them shortens their lifespan, forcing you to replace them more frequently. Sweat and dirt break down the fibers, particularly in leather gloves, leading to premature wear and tear. Employing thoughtful cleaning strategies for golf gloves, such as gentle hand washing or spot cleaning with appropriate materials, significantly extends their durability.
Moreover, regular upkeep prevents unpleasant odors, ensuring your gloves stay fresh round after round.
Understanding Golf Glove Materials
Leather Gloves
Leather gloves are the epitome of sophistication and performance. Made from premium hides, they offer unmatched feel and flexibility. Their natural texture enhances grip, making them a favorite among professionals. However, they’re delicate and require meticulous care. Regular cleaning golf gloves made of leather ensures they remain supple and free from cracks. Using the best practices for golf glove cleaning, such as conditioning after cleaning, can extend their lifespan significantly.
Synthetic Gloves
Synthetic gloves bring durability and affordability to the table. Designed to withstand wear and tear, they are ideal for casual players or those who frequent humid conditions. They dry faster than leather and are easier to maintain. Employing effective cleaning strategies for golf gloves helps preserve their elasticity and vibrant appearance. While they may lack the luxurious feel of leather, their resilience makes them a popular choice.
Hybrid Gloves
For those seeking the best of both worlds, hybrid gloves combine leather palms with synthetic backings. This blend offers the comfort and grip of leather where it matters most, paired with the durability of synthetic materials. Hybrid gloves require thoughtful maintenance.
Preparing to Clean Your Golf Gloves
Assessing the Condition of Your Glove
The first step in glove care is evaluating whether they need cleaning or replacement. Gloves endure considerable stress during play, and their condition can vary widely based on usage and maintenance habits.
When to Clean vs. When to Replace
If your gloves are lightly soiled with sweat or dirt, a thorough cleaning will usually restore their usability. However, if you notice significant wear—such as thinning material, tearing at the seams, or loss of grip—it might be time to retire them. For leather gloves, check for cracks or excessive stiffness; these are often signs they’re beyond saving.
Hybrid or synthetic gloves, on the other hand, might show fraying or permanent staining when it’s time for replacement.
Identifying Damage
Before cleaning, inspect your gloves closely. Look for discoloration, hardened spots, or areas where the material has stretched unnaturally. Spot cleaning or gentle washing can address most issues, but attempting to clean damaged gloves could worsen their condition.
Gathering Necessary Cleaning Supplies
Once you’ve determined your gloves are worth saving, it’s time to gather the right tools for the job. Using the appropriate supplies ensures you follow the best practices for golf glove cleaning, maintaining their quality and longevity.
Mild Detergents
For most gloves, a gentle detergent is ideal. Harsh chemicals can strip away the natural oils in leather or weaken synthetic fibers. Opt for detergents labeled as mild or suitable for delicate fabrics.
Soft Cloths or Sponges
Avoid abrasive cleaning tools that might scratch or tear the glove material. A soft cloth or sponge works perfectly for applying cleaning solutions and gently scrubbing away dirt. These tools are a cornerstone of cleaning strategies for golf gloves and ensure no harm comes to their surface.
Specialized Leather Cleaners
Leather gloves often require specialized care. A high-quality leather cleaner helps remove grime while conditioning the material, preserving its softness and grip. If your gloves are hybrid, apply the cleaner only to the leather sections to avoid damaging the synthetic parts.
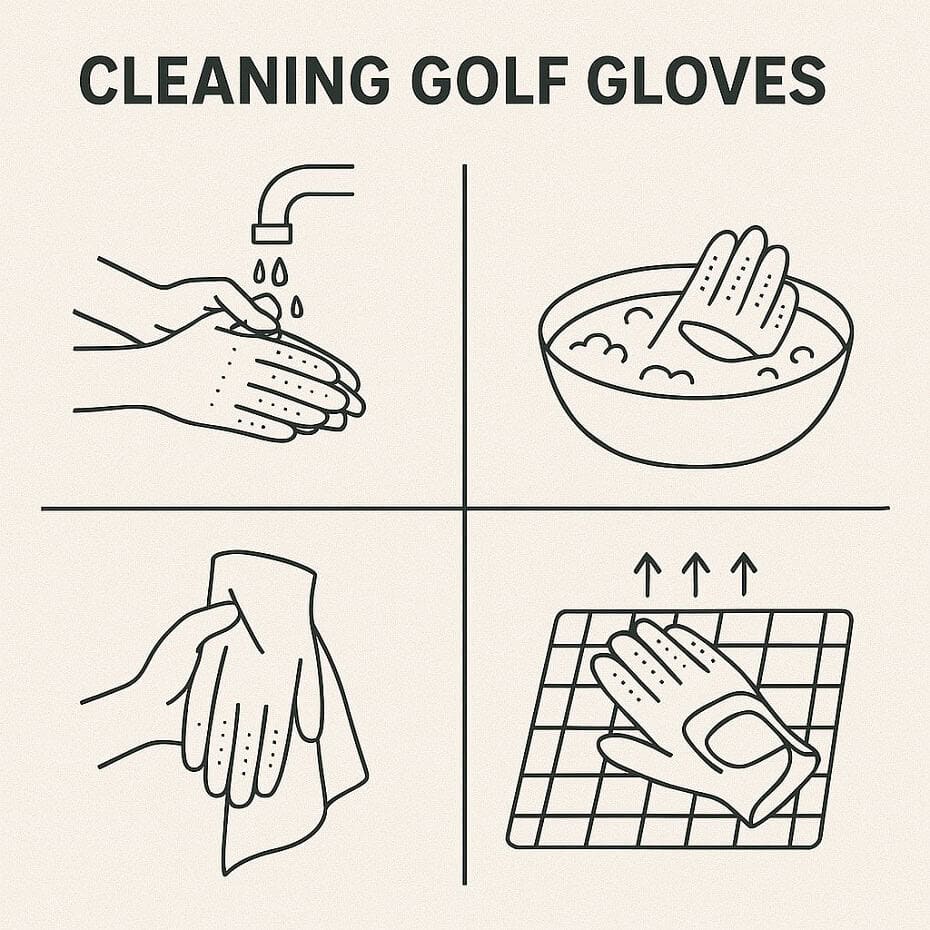
Step-by-Step Cleaning Guide
1. Spot Cleaning for Light Dirt
Sometimes, your gloves need just a quick refresh. Spot cleaning is perfect for removing small stains or dirt without overdoing it.
How to Gently Remove Stains
Begin by identifying the areas with visible dirt or discoloration. Using a damp, soft cloth or sponge, lightly dab the affected spots. Avoid vigorous rubbing, as this can damage delicate materials like leather or stretch synthetic fibers. For leather gloves, use lukewarm water and apply minimal pressure to maintain their supple texture. Spot cleaning is one of the most effective cleaning strategies for golf gloves when addressing minor grime.
Products to Use
The key to spot cleaning is using the right products. For leather gloves, choose a pH-balanced leather cleaner or mild soap diluted with water. Synthetic gloves benefit from a gentle detergent designed for sportswear. Always avoid harsh chemicals or abrasive cleaners, as they can weaken the material and reduce the glove’s lifespan. Following the best practices for golf glove cleaning, test any product on an inconspicuous area first to ensure compatibility.
2. Deep Cleaning for Persistent Dirt
When your gloves have endured heavy use, a more thorough cleaning is necessary. Deep cleaning effectively removes embedded dirt and revitalizes the material.
Soaking Techniques for Leather Gloves
Leather gloves require special care to preserve their premium feel and functionality. Fill a bowl with lukewarm water and add a few drops of mild detergent or a dedicated leather cleaner. Submerge the gloves briefly, ensuring they’re not left soaking for too long to avoid waterlogging the material.
Gently massage the surface of the gloves with your hands to loosen dirt and sweat. Rinse thoroughly under cool water until no detergent residue remains. After rinsing, pat the gloves dry with a soft towel and allow them to air-dry naturally. Avoid direct sunlight or heat sources, as these can cause the leather to crack or shrink.
Cleaning Synthetic Gloves Safely
Synthetic gloves are more resilient to moisture but still require careful handling. Fill a sink or basin with lukewarm water and a small amount of detergent. Gently agitate the gloves in the water, focusing on heavily soiled areas.
For stubborn dirt, use a soft-bristled brush to gently scrub the surface. Rinse thoroughly and squeeze out excess water without wringing the gloves. Let them air-dry completely before using them again. This approach aligns with cleaning strategies for golf gloves, ensuring synthetic materials retain their shape and elasticity.
3. Dealing with Stains
Stains and odors can be a golfer’s nemesis, but with the right tactics, even the toughest marks can be tackled.
Removing Grass and Dirt Stains
Grass and dirt stains are common after a long day on the course. For leather gloves, apply a small amount of specialized leather cleaner directly to the stained area and gently rub it in circular motions with a soft cloth. Synthetic gloves can withstand slightly more pressure, so you can use a diluted detergent solution and a soft-bristled brush to scrub the stains away.
After treating the stains, rinse the gloves thoroughly and inspect the results. Persistent marks may require a repeat application or additional scrubbing.
Handling Tough Odors
Sweat and moisture can lead to unpleasant odors that linger in your gloves. To combat this, sprinkle a small amount of baking soda inside the gloves after cleaning. Baking soda naturally absorbs odors without harming the material.
For leather gloves, consider using a leather conditioner with a pleasant scent to restore freshness while maintaining suppleness. Synthetic gloves can be treated with a gentle fabric refresher, provided it doesn’t leave a residue. Proper odor control is a vital part of learning to clean golf gloves and keeping them pleasant to use.
Step-by-Step Cleaning Process for Leather Golf Gloves
Step 1: Inspect the Gloves
Before you begin, assess your gloves for visible dirt, stains, and signs of wear. If the leather shows cracks or thinning, cleaning may not revive them entirely, and replacement might be a better option. For gloves in good condition, proceed with a gentle cleaning process to avoid damaging the leather.
Step 2: Gather Cleaning Supplies
For leather gloves, you’ll need the following:
- Mild detergent or a specialized leather cleaner
- A soft cloth or sponge
- Lukewarm water
- A soft, absorbent towel
- Optional: Leather conditioner
Step 3: Prepare the Cleaning Solution
In a small bowl, mix a few drops of mild detergent or leather cleaner with lukewarm water. Ensure the solution is well-diluted, as overly concentrated soap can strip the natural oils from the leather.
Step 4: Spot Clean
Dip a soft cloth or sponge into the cleaning solution and wring out the excess liquid. Gently dab the soiled areas, focusing on spots with visible dirt or stains. Avoid soaking the gloves entirely, as excessive moisture can weaken the leather.
For stubborn stains, apply a small amount of cleaner directly to the spot and use circular motions to lift the dirt. Be patient and avoid scrubbing too vigorously.
Step 5: Rinse and Remove Residue
Using a clean, damp cloth, gently wipe away any remaining soap or cleaner. Ensure no residue is left behind, as this could cause stiffness or discoloration.
Step 6: Dry the Gloves
Pat the gloves dry with a soft towel to remove excess moisture. Then, reshape the gloves by gently pulling on the fingers and palm to restore their natural form. Place the gloves in a cool, well-ventilated area to air-dry. Avoid direct sunlight, heaters, or other heat sources, as these can cause the leather to crack or shrink.
Step 7: Condition the Leather
Once the gloves are completely dry, apply a leather conditioner to restore suppleness and prevent cracking. Use a small amount, spreading it evenly with a soft cloth. Conditioning is a crucial step in cleaning strategies for golf gloves, especially for leather ones, as it maintains their luxurious feel.
Step 8: Store Properly
Store your gloves in a cool, dry place, preferably in a glove-specific pouch or breathable container. Proper storage ensures they remain fresh and ready for your next round.
Step-by-Step Cleaning Process for Synthetic Golf Gloves
Step 1: Inspect the Gloves
Before starting, examine your gloves for dirt, stains, or damage. Synthetic gloves are more resistant to wear than leather but can still develop tears or thinning areas. If the gloves are excessively worn, cleaning may not restore them fully, and replacement could be necessary.
Step 2: Gather Cleaning Supplies
You’ll need the following items:
- Mild detergent or a gentle soap
- Lukewarm water
- A soft cloth, sponge, or soft-bristled brush
- A towel for drying
Step 3: Prepare the Cleaning Solution
Fill a basin or sink with lukewarm water and add a small amount of mild detergent. Stir the water to create a soapy solution. Avoid harsh chemicals or bleach, as they can damage synthetic materials.
Step 4: Hand Wash the Gloves
Submerge the gloves in the soapy water, ensuring they’re fully soaked. Gently agitate the gloves in the solution to loosen dirt and grime. Focus on heavily soiled areas by rubbing them gently with your fingers or a soft-bristled brush. This step aligns with effective cleaning strategies for golf gloves while preserving their structure.
Step 5: Rinse Thoroughly
Remove the gloves from the soapy water and rinse them under cool, running water. Ensure all detergent residue is washed away, as lingering soap can cause stiffness or irritation during wear.
Step 6: Remove Excess Water
Gently press the gloves between your hands or against a towel to remove excess water. Avoid wringing or twisting the gloves, as this can distort their shape or damage seams.
Step 7: Air-Dry the Gloves
Lay the gloves flat on a clean towel or hang them in a well-ventilated area to dry naturally. Keep them away from direct sunlight, heaters, or other heat sources, as these can cause synthetic materials to degrade or lose elasticity.
Step 8: Restore Shape
Once dry, put the gloves on briefly to restore their natural fit and flexibility. This step ensures they’ll feel comfortable and perform well during your next round.
Step 9: Store Correctly
Store synthetic gloves in a cool, dry place. Avoid cramming them into your golf bag, as this can cause unnecessary wear and tear. Proper storage complements the best practices for golf glove cleaning, helping your gloves last longer.
Post-Cleaning Care
Drying Golf Gloves Properly
Avoiding Heat Damage
After washing, your golf gloves are vulnerable to damage from improper drying techniques. Resist the temptation to speed up the process using heaters, dryers, or direct sunlight. Heat can weaken synthetic materials and cause leather to crack or warp. Instead, opt for methods that preserve the integrity of your gloves, following best practices for glove cleaning.
Air Drying Techniques
To air dry, gently press your gloves with a soft towel to remove excess water. Then, lay them flat in a well-ventilated area. For leather gloves, this step is particularly important to avoid shrinking or hardening. Place them on a clean, dry surface or hang them with clothespins, ensuring no creases form during the drying process. These techniques align with effective cleaning strategies, ensuring they’re ready for action.
Restoring Glove Shape
Using a Glove Form
Once your gloves are dry, restoring their shape is essential for a snug fit and improved performance. A glove form is a fantastic tool for this task. Slide your gloves onto the form while they’re still slightly damp. This not only helps maintain their original contour but also prevents any unsightly wrinkles or folds.
Hand-Shaping Methods
If you don’t have a glove form, don’t worry. Slip your hand into the glove and gently stretch it, focusing on the fingers and palm areas. This method ensures your gloves feel natural and ready to grip the club securely.
Conditioning Leather Gloves
Benefits of Conditioning
Leather gloves require extra care to keep them supple and durable. Conditioning restores the natural oils lost during washing, preventing cracks and maintaining flexibility. This step enhances the longevity of leather gloves, ensuring you get the most out of your investment.
Best Products for Leather Care
Choose a high-quality leather conditioner or balm specifically formulated for sports gloves. Apply a small amount to a soft cloth and rub it evenly into the leather, focusing on areas prone to stiffness. Let the conditioner absorb fully before storing the gloves. Regular conditioning is among the best practices for cleaning, ensuring your gloves look and feel like new after every cleaning session.
Storage: The Final Touch
Proper storage is the cherry on top of your glove care routine. Avoid tossing your gloves into your golf bag immediately after cleaning. Instead, store them in a breathable pouch or glove-specific case to protect them from moisture and dust. A well-maintained glove is your trusted companion on the green, and these steps help ensure they stay in peak condition.
Preventative Maintenance
Storing Your Golf Gloves Correctly
Ideal Storage Conditions
Proper storage plays a vital role in preserving your golf gloves. After cleaning golf gloves, avoid cramming them into a damp, dark pocket of your golf bag. Instead, opt for a cool, dry environment with good airflow. A breathable pouch or mesh bag is ideal, as it prevents moisture build-up that can lead to unpleasant odors and material degradation.
Preventing Creases
To maintain the glove’s shape, never fold it haphazardly. Lay it flat or gently insert it into a glove form. This precaution avoids unsightly creases and ensures your gloves fit perfectly the next time you play. Proper storage isn’t just about organization—it’s a cornerstone of extending glove lifespan.
Rotating Gloves During Play
Benefits of Alternating Gloves
Frequent golfers know the value of alternating between multiple gloves. Rotating gloves during play reduces constant exposure to sweat and moisture, which can weaken the material. By letting one glove rest and air out while using another, you not only enhance comfort but also extend the life of each glove.
Reducing Wear and Tear
When you switch gloves, you distribute the wear and tear across several pairs rather than overburdening one. This small habit reduces the likelihood of premature thinning, holes, or compromised grip—making it a must-do for serious golfers. A little foresight in glove rotation goes hand in hand with smart care, including cleaning golf gloves regularly.
Using Glove Protectors
How Protectors Prevent Damage
Glove protectors are an underrated tool for golf enthusiasts. These simple devices provide a firm structure to your gloves when not in use, ensuring they don’t get crushed or misshapen in your bag. They’re particularly useful for leather gloves, which are prone to stiffness and creasing without proper support.
Best Protector Types
From hard-shell cases to lightweight plastic molds, glove protectors come in a variety of styles to suit different needs. Choose one that balances durability with convenience. A good protector isn’t just about storage; it actively prevents long-term damage, complementing your efforts in cleaning golf gloves and maintaining their condition.
Special Situations
Cleaning Gloves After Rainy Rounds
Handling Wet Gloves Safely
Rain can leave your golf gloves drenched and fragile. Begin by gently wringing out excess water without twisting or pulling the material, as this can distort its shape. For leather gloves, pat them dry with a soft, absorbent cloth to preserve the integrity of the material. Synthetic gloves, though slightly more resilient, also require delicate care.
Once you’ve removed the bulk of the moisture, reshape the gloves carefully. Slide your hand into the glove and adjust it back to its natural contour to prevent unsightly wrinkles. Following these steps while cleaning golf gloves post-rain ensures they’re ready for your next round.
Preventing Mold and Mildew
Leaving damp gloves unattended invites mold and mildew, which not only compromise the glove’s structure but also create unpleasant odors. To counter this, place your gloves in a well-ventilated space. Avoid using direct heat sources like radiators or blow dryers, as they can cause leather to crack or synthetic materials to shrink.
A silica gel packet or a small sachet of baking soda in the storage area can help absorb excess moisture and eliminate potential fungal growth. These proactive measures go hand-in-hand with effective cleaning golf gloves practices.
Cleaning Gloves in Humid Climates
Combatting Excess Moisture
High humidity can make gloves perpetually damp, even without rain. After every round, wipe your gloves with a clean, dry towel to remove sweat and ambient moisture. For leather gloves, follow this with a gentle application of a leather conditioner to maintain softness and flexibility. Synthetic gloves, on the other hand, benefit from regular air-drying sessions to keep them fresh.
Tips for Faster Drying
In humid conditions, traditional air-drying might take longer than usual. Speed up the process by placing the gloves in a breezy spot or using a fan to enhance airflow. Another effective trick is to stuff the gloves with crumpled newspaper. The paper absorbs moisture while maintaining the glove’s shape.
If drying time is critical, consider a portable glove dryer designed for sports gear. This handy gadget can work wonders in keeping your gloves game-ready. Remember, though, that proper cleaning golf gloves remains essential to prevent any residue buildup during humid spells.
Troubleshooting Common Issues
1. Gloves Feeling Stiff After Cleaning
How to Soften Leather Gloves
Leather gloves can sometimes feel rigid post-cleaning, especially if they’ve dried too quickly or without proper conditioning. To restore their suppleness, apply a small amount of leather conditioner. Use a soft cloth to gently massage the product into the glove, paying extra attention to areas that bend frequently, like the fingers and palm.
For gloves that need an extra boost, wearing them while they’re slightly damp (but not wet) allows your natural hand movements to stretch the material back into shape. This step pairs perfectly with your cleaning golf gloves routine to keep them game-ready.
Fixing Overwashed Synthetics
Synthetic gloves may stiffen if exposed to excessive cleaning agents or improper drying. To remedy this, rinse them thoroughly with lukewarm water to remove any residue. Air dry the gloves away from direct heat, and once dry, work the fabric by bending and flexing it gently. Regular care helps synthetic gloves maintain their flexibility over time.
2. Persistent Odors After Cleaning
Odor Neutralizers to Try
Sometimes, even after cleaning golf gloves, unpleasant odors linger. To combat this, consider using natural odor neutralizers like baking soda. Sprinkle a small amount inside the gloves and let it sit overnight before shaking it out the next day.
For more stubborn smells, lightly spritz the gloves with a mixture of water and white vinegar (in a 3:1 ratio). The vinegar’s antibacterial properties work wonders in neutralizing bad odors. Make sure to air dry the gloves completely before storing them.
When to Replace the Glove
If the odor remains despite repeated efforts, it might signal the end of the glove’s usable life. Persistent smells can be a sign of deeply ingrained bacteria or material breakdown, both of which compromise performance. In such cases, it’s best to invest in a new pair while ensuring your cleaning golf gloves habits are consistent moving forward.
3. Color Fading in Leather Gloves
Restoring Color with Dyes
Frequent cleaning and exposure to sunlight can cause leather gloves to lose their vibrant color. To revive their look, use a specialized leather dye in a shade that matches the original hue. Apply the dye sparingly with a soft applicator, following the product’s instructions.
Once the dye is dry, apply a leather conditioner to seal in the color and enhance the glove’s overall texture. This process not only restores aesthetic appeal but also reinforces the glove’s durability.
Preventing Future Fading
Preventing color loss starts with smart care practices. After cleaning golf gloves, store them in a cool, shaded area to protect them from UV damage. Additionally, using a leather protector spray can create a barrier against sun exposure and moisture, extending the glove’s lifespan and keeping its appearance intact.
3. Using Harsh Detergents
One of the most common mistakes when cleaning golf gloves is using harsh detergents or soaps that can strip the material of its natural oils. These strong chemicals can lead to gloves becoming stiff and losing their flexibility. Always opt for a mild detergent or a specialized glove cleaner to preserve the quality of your gloves.
4. Soaking Leather Gloves
Leather is a delicate material that can lose its structure if exposed to too much water. Soaking your leather golf gloves is a big mistake! Instead, gently spot-clean stains with a damp cloth and avoid submerging them. For deep cleaning, use a leather-specific cleaner that’s designed to work with the material’s unique needs.
5. Using High Heat to Dry Gloves
Another mistake is trying to speed up the drying process by using a hairdryer, heater, or placing your gloves in the dryer. Excess heat can cause leather to crack or synthetic materials to warp. The best method is air drying golf gloves naturally in a well-ventilated area. Patience is key here!
6. Scrubbing Too Hard
When trying to remove stains or dirt, it can be tempting to scrub hard, but this can damage the glove’s surface. Be gentle with your cleaning techniques, using a soft cloth or sponge to avoid wearing down the fabric or leather. Over-scrubbing can also lead to color fading and material breakdown.
7. Forgetting to Condition Leather Gloves
Leather gloves need a bit of TLC after cleaning to remain soft and durable. Skipping the conditioning step can lead to the leather becoming dry and brittle over time. After cleaning golf gloves, make sure to use a good-quality leather conditioner to restore moisture and maintain the glove’s flexibility.
8. Storing Gloves While They’re Still Wet
Never store your gloves while they’re still damp, as this can cause mold and mildew to form. Always ensure they are completely dry before putting them away, especially if they’ve been exposed to moisture during a rainy round. Proper storage is essential for maintaining the glove’s shape and longevity.
9. Ignoring Regular Maintenance
Regular cleaning is important, but so is regular maintenance. Don’t wait until your gloves are visibly dirty or stinky to clean them. Regular cleaning strategies ensure they remain in top condition, providing optimal performance round after round.
Frequently Asked Questions (FAQs)
1. How often should I clean my golf gloves?
It’s recommended to clean your golf gloves every 3-5 rounds, depending on how much you use them and the conditions you play in. If you’re playing in particularly hot, humid, or rainy conditions, you might need to clean them more frequently. Regular cleaning keeps the gloves flexible, breathable, and free of dirt and grime that can affect your grip.
2. Can I wash golf gloves in a washing machine?
It’s best to avoid machine washing golf gloves, especially leather ones, as it can damage the material. For cleaning golf gloves, stick to hand washing with mild soap and warm water to protect the integrity of the glove. If you absolutely need to machine wash, use a delicate cycle and place the gloves in a mesh laundry bag to minimize potential damage.
3. What is the best way to dry gloves quickly?
Avoid using a dryer or direct heat to dry your golf gloves, as this can cause cracking or shrinking. Instead, air dry golf gloves by gently reshaping them and leaving them in a well-ventilated area away from direct sunlight or heat sources. You can also stuff them with paper towels or a soft cloth to help them maintain their shape and speed up drying.
4. Are leather and synthetic gloves cleaned differently?
Yes, leather and synthetic gloves require different care techniques. For leather gloves, avoid soaking them in water, and always use a leather cleaner and conditioner after washing to maintain softness and flexibility. Synthetic gloves can be cleaned in a similar manner but are generally more durable and resistant to water, making them easier to clean and dry.
5. How can I remove a bad smell from my golf glove?
To remove odors, try sprinkling baking soda inside the glove and letting it sit overnight. For more stubborn smells, mix water with a small amount of white vinegar and lightly spritz the gloves. Always air dry your gloves after cleaning to ensure they stay fresh. If the odor persists, it may be time to replace the glove, especially if the material has deteriorated.
Conclusion…
Taking care of your golf gloves is essential for maintaining their performance, comfort, and longevity. From cleaning golf gloves regularly to ensuring they’re properly dried and stored, each step plays a crucial role in extending the life of your gloves and keeping them in top shape.
Whether you’re dealing with light dirt or tough stains, the right cleaning strategies for golf gloves can make all the difference. By following best practices for golf glove cleaning, including using the correct products and techniques, you ensure your gloves remain a reliable part of your game.
Remember, a little care goes a long way. So, treat your golf gloves with the attention they deserve, avoid common cleaning mistakes, and they’ll continue to perform at their best, round after round.
Amazon and the Amazon logo are trademarks of Amazon.com, Inc, or its affiliates.

Daisy is the Founder and Editor in Chief of Golfs Hub. She is associated with Golf for more than 20 years. She got the inspiration from her father. She is a very private person & doesn't like to be photographed. She's worked in nearly every job in the golf industry from club fitting to instruction to writing and speaking. Now she is enjoying her retirement from day job... but not from Golf! Daisy lives in southeasternmost part of New York state with her family.
")


